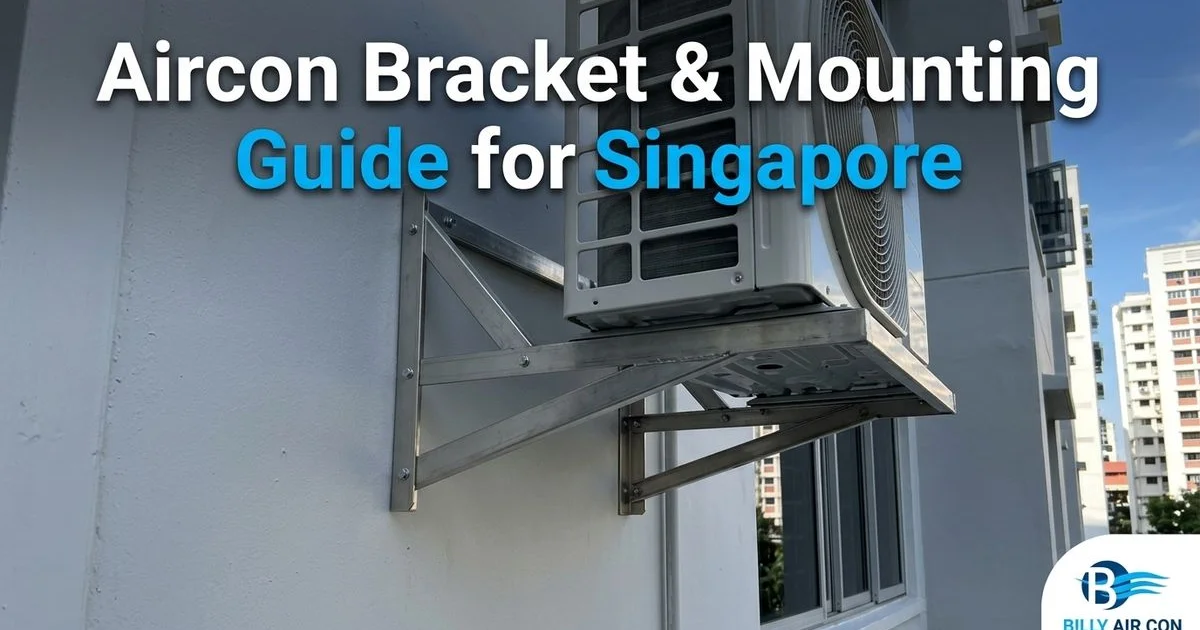
From what I’ve seen, mounting an outdoor compressor is about much more than just finding a spare spot on the wall. You know how quickly a poorly secured 50kg metal box can become a massive safety hazard, especially in high-rise environments. This is where a reliable Aircon Bracket & Mounting Guide for Singapore becomes an absolute necessity.
We handle these critical safety structural checks every single day.
Since starting with just five people in 2003, our team at Billy Aircon has grown to 26 technicians dedicated to aircon servicing across Singapore. Let’s look at the actual HDB and MCST regulations, review the structural data, and walk through the exact replacement methods our experts use to secure outdoor units safely.
Types of Aircon Mounting in Singapore
We see four main ways to support an outdoor compressor. Each method depends heavily on your property type and the specific architectural layout.
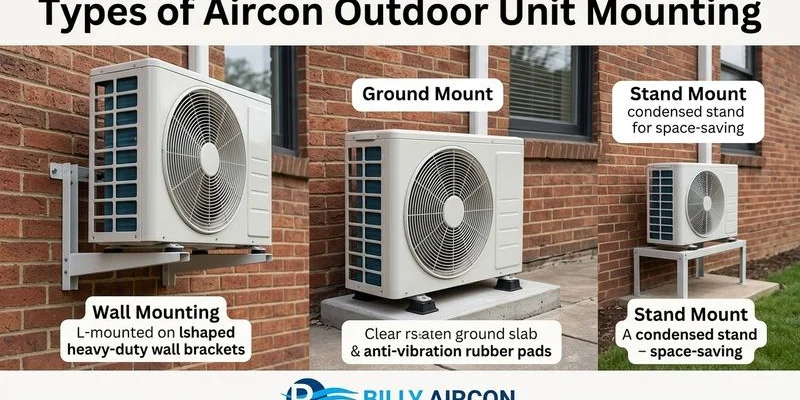
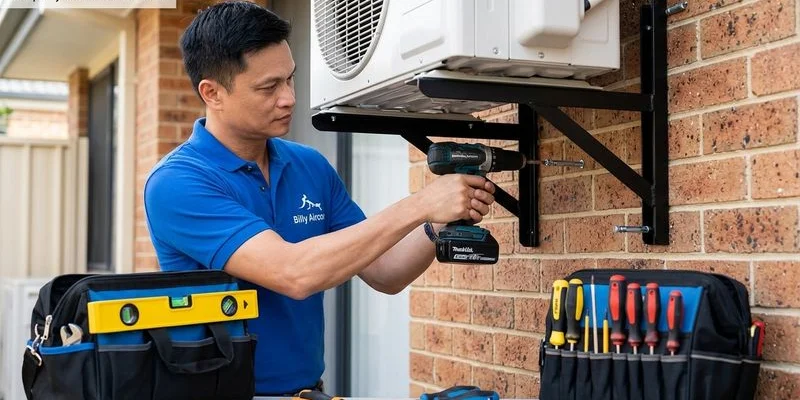
Wall-Mounted Brackets
The classic L-shaped metal brackets are bolted directly to external walls. These supports carry the full weight of the compressor while absorbing constant vibration forces.
Our installers typically use galvanized steel or stainless steel for these jobs. Corrosion resistance matters significantly in Singapore because the average daily humidity hovers around 84%.
For homes in coastal areas like Marine Parade or East Coast, we strongly recommend SS316 stainless steel. The SS316 grade contains an element called molybdenum. This specific chemical addition resists salt spray corrosion much better than standard SS304 steel.
Aircon Ledge
Many newer Build-To-Order (BTO) flats and condominiums feature dedicated concrete platforms. Building designs now integrate these spaces adjacent to the household shelter specifically for outdoor units.
You do not need to install metal brackets if your home has one of these ledges. The unit sits directly on rubber anti-vibration pads placed on the concrete. The equipment still requires secure positioning to prevent movement during operation.
Ground-Level Placement
Landed properties in areas like Bukit Timah often place the condenser directly on the floor. Installers rest the machine on a poured concrete pad or a heavy pre-fabricated base.
This method eliminates working at heights and simplifies maintenance. The setup requires clear space around the entire casing to ensure proper airflow and prevent overheating.
Ceiling/Overhead Mounting
Commercial buildings and some basement car parks utilize overhead mounting systems. Technicians bolt heavy-duty suspension brackets straight into the reinforced ceiling slab.
Our commercial teams use this layout when floor space is completely unavailable. The ceiling mounts provide secure support while keeping pedestrian walkways clear.
HDB Regulations for Aircon Installation
The Housing & Development Board enforces strict rules regarding compressor placement. Knowing these structural limits before scheduling your installation saves you from costly rectifications later. HDB regulations mandate a strict maximum weight limit of 110kg per wall panel, which applies whether the unit sits on a bracket or a ledge.
Where You Can Install
You must place the equipment in approved zones to comply with building safety codes.
Permitted locations:
- A designated concrete ledge built into the flat
- An external wall bracket fixed at the rear kitchen or bedroom facade
- A common corridor space, provided you maintain a strict 1.2m clear walking path
Locations to avoid:
- The front exterior facade of the building
- Any area blocking the 1.2m corridor clearance
- Inside the home where hot exhaust vents into common walkways
- Rooftops of public housing blocks without explicit official approval
HDB Renovation Guidelines
The building codes dictate exactly how the electrical and structural work must happen.
- You must hire a BCA-trained installer for the bracket and electrical wiring.
- The power supply must feature a 15-Amp power point or a 20-Amp double pole isolator to restrict running current.
- Installers must anchor the metal supports using approved heavy-duty bolts.
- Condensation pipes must route into a designated internal floor trap to prevent public dripping.
- Installers must limit split-type condensing units to a maximum of two per flat.
Permit Requirements
A standard split system swap usually falls under a general renovation permit. You will need special Town Council approval for certain complex jobs.
- Drilling large core holes through structural concrete walls
- Modifying the original exterior facade
- Mounting the compressor in non-standard locations
Condominium Rules
Management Corporation Strata Title (MCST) by-laws govern private property upgrades. These private condo rules are frequently much stricter than public housing guidelines. You must submit your plans to the managing agent before drilling any holes.
Our technicians frequently coordinate with security and management to ensure compliance. Common restrictions dictate exactly where you can mount the machinery.
- Approved locations: Most estates designate a specific balcony corner or ledge.
- Color coding: Management often requires the metal brackets and PVC trunking to perfectly match the exterior paint color.
- Noise control: Compressors cannot sit directly adjacent to a neighboring unit’s bedroom window.
- Drainage mapping: Water must flow into specific balcony floor traps to prevent lower-floor leaks.
- Vendor clearance: The MCST may require your contractor to submit a specific installation blueprint for approval.
Failing to follow these strata rules often results in heavy fines. You might even have to dismantle the entire setup at your own expense.
Bracket Safety: What to Look For
Understanding load limits prevents catastrophic accidents. The metal supports must handle the static weight plus the dynamic force of a vibrating motor.
Load Capacity
Outdoor compressors carry significant mass. Modern multi-split setups, like a System 4 from brands such as Daikin, can easily weigh upwards of 60kg.
| Unit Size | Weight Range |
|---|---|
| 9,000 BTU (2.5kW) | 25 to 35 kg |
| 12,000 BTU (3.5kW) | 30 to 40 kg |
| 18,000 BTU (5.0kW) | 40 to 55 kg |
| 24,000 BTU (7.0kW) | 50 to 70 kg |
We install brackets rated to carry at least twice the unit’s actual weight. A standard pair of residential supports should safely hold 100kg each.
This safety margin accounts for strong wind loads and long-term metal fatigue.
Bracket Material
The steel grade determines how long the support lasts before rusting.
- Galvanized steel: This affordable option works well for inland neighborhoods. It typically shows surface rust after five to eight years of rain exposure.
- Stainless steel (SS304): This upgrade offers excellent rain protection. It serves as the standard choice for most modern residential jobs.
- Stainless steel (SS316): This premium grade costs 30% to 50% more than SS304 but includes molybdenum. The chemical addition provides superior resistance against coastal salt spray.
Anchoring
The bolts holding the metal to the concrete are the most critical safety failure point.
- Concrete walls: Installers use chemical anchors, like those from Fischer or Hilti, for maximum grip.
- Brick walls: Technicians utilize heavy-duty wall plugs and deep through-bolts.
- Lightweight walls: These surfaces require structural reinforcement plates to distribute the load.
Our crews strictly drill into solid load-bearing concrete. Installers never anchor into hollow blocks, soft plaster, or decorative tiles.
Signs Your Existing Bracket Needs Attention
Metal supports degrade over time due to weather and constant motion. You should inspect your exterior setup annually if the unit is more than five years old.
1. Deep Visible Rust
Surface discoloration on galvanized steel is normal. You need to worry when the rust creates deep pits in the metal. Flaking steel means the structural thickness has decreased, so pay special attention to the bolt holes where rainwater tends to pool.
2. Bracket Shifting or Tilting
A compressor that looks slightly slanted indicates a serious problem. The concrete around the anchor points may be deteriorating. We sometimes see this when the original installer used undersized expansion bolts. A tilted base is a massive safety hazard that requires immediate correction.
3. Excessive Vibration
A well-mounted compressor should produce a steady, low hum. Violent shaking usually means the rubber dampeners have completely worn out. It can also indicate a loose mounting bolt or an internal compressor fault. Constant vibration rapidly accelerates metal fatigue and loosens the wall anchors.
4. Unusual Metallic Sounds
Loud clanking or rattling noises point directly to loose hardware. Do not ignore metal-on-metal sounds echoing from the exterior wall. These warning signs almost always precede a complete mechanical failure.
5. Unexplained Water Stains
Dark water streaks on the wall below the unit highlight poor drainage. Stagnant water pooling on the metal frame causes accelerated corrosion. The National Environment Agency (NEA) actively issues fines for stagnant water that creates mosquito breeding grounds.
Bracket Replacement: When and How
Replacing the mounting hardware is a highly technical process. It requires handling high-pressure refrigerant gases alongside heavy lifting.
When to Replace
You should schedule a replacement if you notice specific failure points. Many homeowners upgrade their brackets during the HDB Home Improvement Programme (HIP).
- Deep pitting rust has eaten away the metal.
- Wall anchors show a visible gap pulling away from the concrete.
- The steel arms look physically bent or the welds are cracked.
- You are upgrading to a heavier System 3 or System 4 machine.
- The setup is more than ten years old in a coastal district.
How Replacement Works
Technicians cannot simply lift the heavy box off the wall. The process requires careful sequence planning.
- Refrigerant Recovery: Our technicians use a vacuum pump and digital scale to safely pump the R32 or R410A gas back into a recovery cylinder. Venting these gases into the atmosphere is strictly prohibited by the NEA.
- Dismantling: The crew disconnects the copper pipes and unbolts the old rusted frame.
- Wall Inspection: Installers check the concrete surface for hidden cracks or spalling.
- New Anchors: The team drills fresh holes and mounts the new metal frame. We often shift the position slightly to avoid reusing weakened concrete holes.
- Reconnection: The crew places the unit on fresh rubber pads, connects the copper lines, and tests the cooling pressure.
You cannot DIY this project. It strictly requires certified technicians to handle the chemical gases and structural bolting safely.
Anti-Vibration Pads and Dampeners
Small rubber blocks sit directly between the heavy machine and the metal frame. These inexpensive dampeners serve a critical function in prolonging the lifespan of your equipment.
We install thick neoprene or ribbed rubber pads, usually around 15mm to 20mm thick. They absorb the aggressive low-frequency vibrations generated by the spinning motor. This absorption prevents the metal casing from rattling directly against the steel bracket.
Fresh rubber reduces the stress transferred into the concrete wall anchors. You should replace these blocks whenever they look cracked, hardened, or squashed flat. The minimal cost provides a massive improvement in daily noise reduction.
Installation Best Practices
A safe and efficient cooling system requires precise spatial planning. We train our installers to follow a strict set of operational clearances and routing rules.
Clearance Requirements
The spinning fan needs room to breathe and push hot air away.
- Air discharge (front and top): You need at least 300mm of open space for the fan to expel heat.
- Air intake (rear and sides): The machine requires 100mm to 150mm of clearance to pull in fresh air.
- Maintenance access: Technicians need physical room to reach the service valves and electrical boards.
- Drainage routing: The water pipe requires a slight downward gradient for gravity flow.
Choking the airflow causes the compressor to severely overheat. This mistake permanently damages the internal motor and drives up your monthly electrical bill.
Drainage Connection
The machine produces gallons of condensation daily. Installers must route this water through rigid 16mm PVC pipes directly to a designated floor trap.
You cannot let this water drip freely out of the casing. Public dripping damages the paintwork below and prompts immediate complaints from annoyed neighbors.
Cable and Pipe Routing
Copper lines and electrical wires must travel safely from the indoor blower to the outside wall. We wrap the cold copper pipes in Armaflex insulation to prevent external condensation.
Technicians then enclose these insulated lines inside neat PVC trunking. This plastic casing protects the sensitive copper from direct UV sun damage and heavy rain.
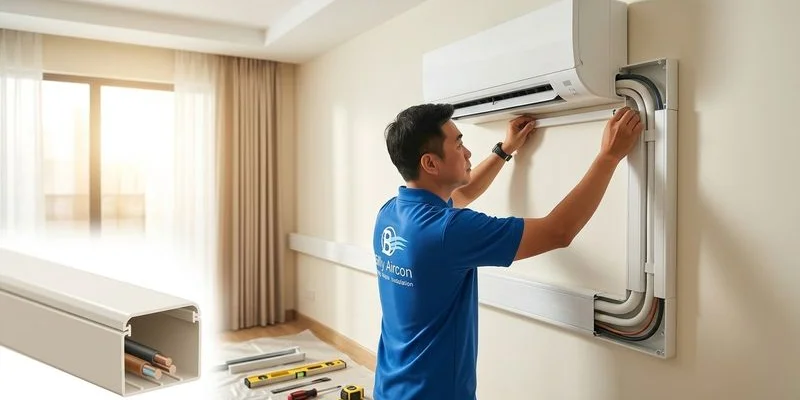
Electrical Safety
Powering a large compressor requires dedicated, heavy-duty wiring.
- The circuit must connect to a correct Miniature Circuit Breaker (MCB) in your main distribution board.
- HDB rules require a 20-Amp double pole isolator switch mounted near the compressor.
- All wiring work must strictly adhere to SS 638, the Singapore Standard for electrical installations.
- The copper wiring must feature a tested and verified earth connection.
Cost of Bracket Installation in Singapore
Budgeting for safe mounting hardware is just as important as choosing the right cooling brand. Upgrading to superior steel grades saves money on premature replacements.
| Item | Estimated Cost |
|---|---|
| Standard wall bracket pair (galvanised) | $60 to $100 |
| Stainless steel bracket pair (SS304) | $100 to $180 |
| Bracket installation labour | Usually included with aircon installation |
| Bracket replacement (standalone) | $150 to $300 (includes gas recovery and vacuum) |
| Anti-vibration pad set (neoprene) | $10 to $30 |
Contractors typically bundle the bracket price into the total purchase package. We have to charge higher labor rates for standalone replacement jobs because the team must fully dismantle and vacuum the existing copper lines.
Do Not Compromise on Mounting Safety
A properly secured metal frame easily lasts a decade. A cheap, poorly anchored support can turn into a deadly falling hazard in just a few short years. You must prioritize structural safety over saving a few dollars.
We always encourage homeowners to ask their contractors about specific weight ratings, chemical anchors, and steel grades. If your current setup shows deep rust or sits at a strange angle, get an inspection immediately. Make sure your home is protected with this practical Aircon Bracket & Mounting Guide for Singapore.
Ready to secure your cooling system the right way? WhatsApp Billy Aircon at +65 9187 4498 to schedule a professional safety inspection and precise bracket installation anywhere in the country.